
why is my water heater leaking at the bottom
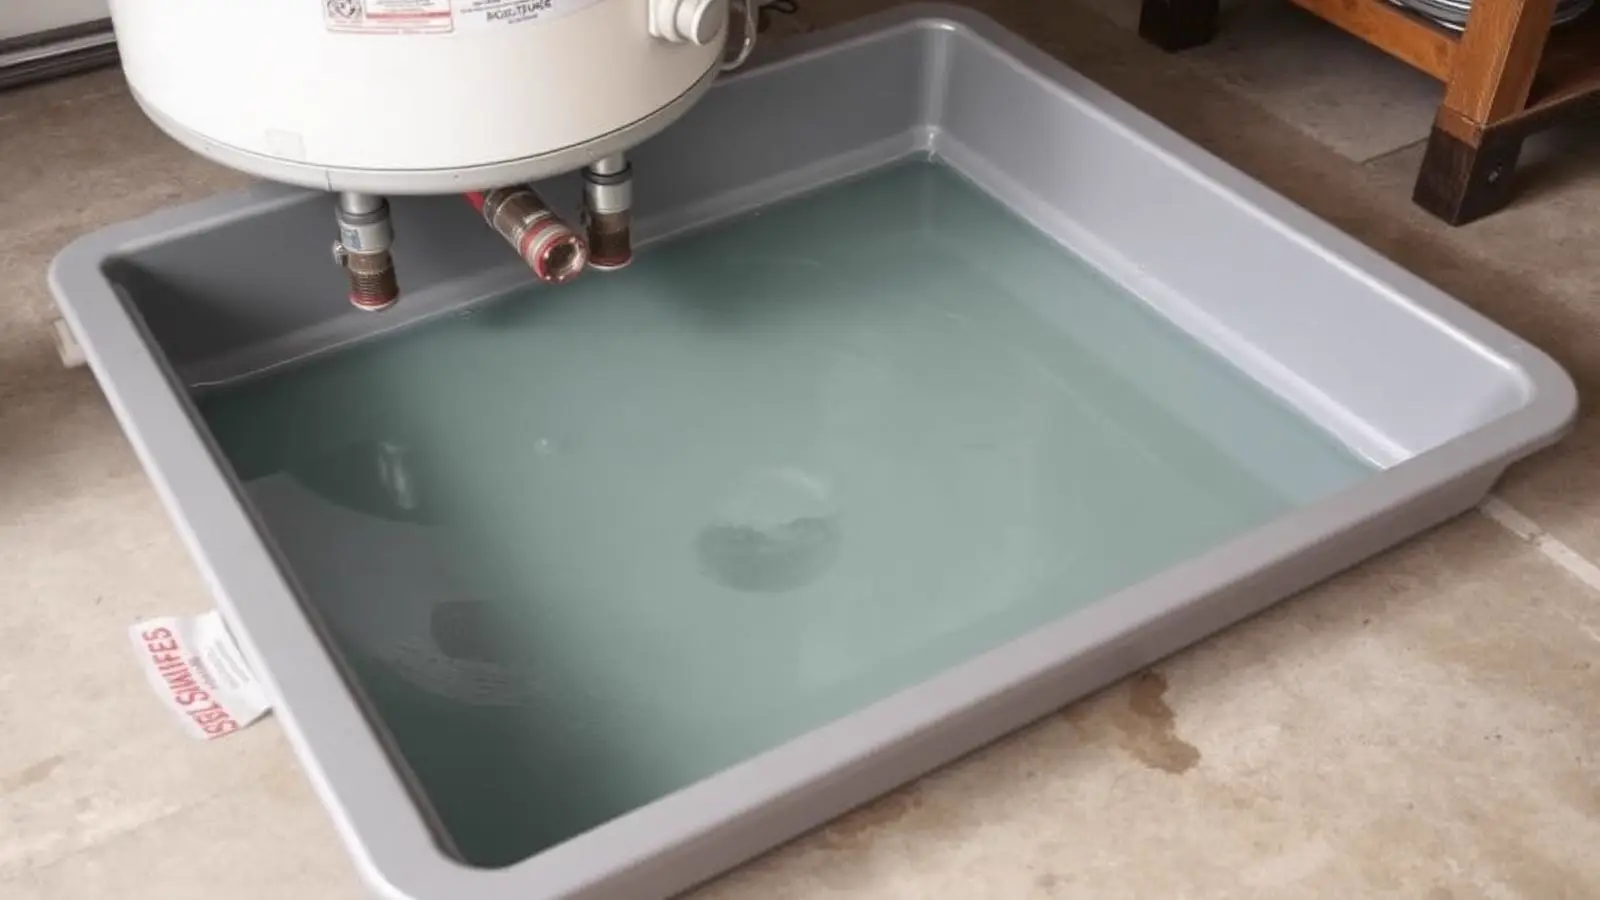
Causes, solutions and when to call a professional
Expert Answer
Use elimination: dry and isolate the drain valve, T&P discharge tube, and tank base one at a time. Whichever stays wet after the others are ruled out is your source — and that determines whether you repair or replace.
How Serious Is This?
Usually Manageable
Monitor it and run the safe checks below before spending money.
Inspection Recommended
Have a professional look at it soon to prevent damage or failure.
This is the level for this problem: Repair soon.
Potentially Serious
Stop using the appliance and get professional help right away.
Safety warning
Standing water at the base of a gas unit can pool near the burner assembly. Shut gas control to OFF and let the area dry before relighting.
Most Likely Causes
- 1Step 1: Isolate and rule out the drain valve
- 2Step 2: Isolate and rule out the T&P discharge tube
- 3Step 3: Confirm tank-body perforation and run the repair-vs-replace math
Safe Homeowner Checks
Dry the valve, thread on a brass hose cap finger-tight, dry the floor beneath it, and check after 10 minutes.
Takes: 10 min · Tools: Towel, Brass hose cap
Dry the valve, thread on a brass hose cap finger-tight, dry the floor beneath it, and check after 10 minutes.
Expect: Floor stays dry with the cap installed if the valve was the source.
What it means: Dry floor rules the drain valve in as the cause; continued wetness rules it out and moves you to step 2.
Next step: If dry: replace with a brass ball valve. If still wet: proceed to the T&P discharge tube.
Check house static pressure with a hose-bib gauge before and after a heating cycle while watching the discharge tube's end.
Takes: 8 min · Tools: Water-pressure gauge
Check house static pressure with a hose-bib gauge before and after a heating cycle while watching the discharge tube's end.
Expect: Pressure of 40–80 psi with less than a 10 psi rise; no discharge from the tube during the test.
What it means: If pressure is elevated and the tube drips, that's your source. If pressure is normal and the tube is dry, move to step 3.
Next step: If confirmed: add a thermal expansion tank or pressure-reducing valve. If ruled out: inspect the tank base itself.
Never cap the discharge tube to test this — it defeats a required safety device.
With the drain valve capped and the T&P tube confirmed dry, tape white paper under the tank's center and check after an hour of use.
Takes: 5 min · Tools: Towel, White paper, Tape
With the drain valve capped and the T&P tube confirmed dry, tape white paper under the tank's center and check after an hour of use.
Expect: Dry paper if the tank body is sound.
What it means: Wet, rust-tinted paper confirms perforation — not repairable.
Next step: Compare the age of the unit and a professional repair quote (if any) against the $1,200–$2,500 replacement cost. Past year 8, replacement almost always wins on cost-per-year.
Shut off water and power/gas immediately once perforation is confirmed.
This page is a decision tool rather than a list: instead of describing each possible bottom cause in isolation, it walks through the exact elimination sequence to pinpoint your specific leak, then gives the repair-versus-replace math once you know which one it is.
Every likely cause, ranked
- #1
Step 1: Isolate and rule out the drain valve
Most common causeThe drain valve is the lowest, easiest point to test first because capping it removes it from the equation entirely in under a minute.
It is the single most common bottom source, so checking it first resolves the majority of cases immediately.
Exact symptoms
- Wet patch directly below the drain spigot
Self-test (10 min) — tools: Towel, Brass hose cap
Dry the valve, thread on a brass hose cap finger-tight, dry the floor beneath it, and check after 10 minutes.
Expect: Floor stays dry with the cap installed if the valve was the source.
What it means: Dry floor rules the drain valve in as the cause; continued wetness rules it out and moves you to step 2.
Next step: If dry: replace with a brass ball valve. If still wet: proceed to the T&P discharge tube.
DIY-eligible · DIY $8 cap, $20–$35 replacement · Pro $150–$250 · 45 minutes
- #2
Step 2: Isolate and rule out the T&P discharge tube
If the drain valve tested dry, the next lowest exit point is the open end of the T&P relief valve's discharge tube, which can drip during or after a pressure event.
It is the second most common source and easy to confuse with a tank leak because both appear near the base.
Exact symptoms
- Wetness at the open pipe end near the floor, away from the tank's direct footprint
Self-test (8 min) — tools: Water-pressure gauge
Check house static pressure with a hose-bib gauge before and after a heating cycle while watching the discharge tube's end.
Expect: Pressure of 40–80 psi with less than a 10 psi rise; no discharge from the tube during the test.
What it means: If pressure is elevated and the tube drips, that's your source. If pressure is normal and the tube is dry, move to step 3.
Next step: If confirmed: add a thermal expansion tank or pressure-reducing valve. If ruled out: inspect the tank base itself.
Never cap the discharge tube to test this — it defeats a required safety device.
Professional repair · DIY $15 gauge to diagnose · Pro $175–$450 · 1–2 hours
- #3
Step 3: Confirm tank-body perforation and run the repair-vs-replace math
With the drain valve and T&P tube both ruled out, remaining moisture directly under the tank's center means bare steel has corroded through after the anode rod was consumed.
By this point in the elimination sequence, it's the only remaining explanation.
Exact symptoms
- Water reappears under the tank's center minutes after drying, even with the other two points capped/confirmed dry
- Rust-tinted water
Self-test (5 min) — tools: Towel, White paper, Tape
With the drain valve capped and the T&P tube confirmed dry, tape white paper under the tank's center and check after an hour of use.
Expect: Dry paper if the tank body is sound.
What it means: Wet, rust-tinted paper confirms perforation — not repairable.
Next step: Compare the age of the unit and a professional repair quote (if any) against the $1,200–$2,500 replacement cost. Past year 8, replacement almost always wins on cost-per-year.
Shut off water and power/gas immediately once perforation is confirmed.
Professional repair · DIY Not repairable · Pro $1,200–$2,500 installed replacement · 3–5 hours
Symptom-to-cause table
Match what you can see, hear or smell to the cause it points at, and the safe next step for that reading.
Wet patch directly below the drain spigot
Likely cause: Step 1: Isolate and rule out the drain valve
Who should handle it: Homeowner, then licensed plumber
Next step: If dry: replace with a brass ball valve. If still wet: proceed to the T&P discharge tube.
Wetness at the open pipe end near the floor, away from the tank's direct footprint
Likely cause: Step 2: Isolate and rule out the T&P discharge tube
Who should handle it: licensed plumber
Next step: If confirmed: add a thermal expansion tank or pressure-reducing valve. If ruled out: inspect the tank base itself.
Water reappears under the tank's center minutes after drying, even with the other two points capped/confirmed dry
Likely cause: Step 3: Confirm tank-body perforation and run the repair-vs-replace math
Who should handle it: licensed plumber
Next step: Compare the age of the unit and a professional repair quote (if any) against the $1,200–$2,500 replacement cost. Past year 8, replacement almost always wins on cost-per-year.
Ten-minute homeowner checklist
- Dry the valve, thread on a brass hose cap finger-tight, dry the floor beneath it, and check after 10 minutes. (10 min · Towel, Brass hose cap)
- Check house static pressure with a hose-bib gauge before and after a heating cycle while watching the discharge tube's end. (8 min · Water-pressure gauge)Never cap the discharge tube to test this — it defeats a required safety device.
- With the drain valve capped and the T&P tube confirmed dry, tape white paper under the tank's center and check after an hour of use. (5 min · Towel, White paper, Tape)Shut off water and power/gas immediately once perforation is confirmed.
Never open an electrical panel, relight a burner you can smell gas near, or drain a tank that is scalding hot. Stop and call a licensed plumber instead.
What this costs to fix
| Cause | DIY cost | Professional cost | Typical time | Who should repair |
|---|---|---|---|---|
| Drain valve (step 1) | $20–$35 | $150–$250 | 45 minutes | Homeowner or licensed plumber |
| T&P discharge tube (step 2) | $15 gauge | $175–$450 | 1–2 hours | Licensed plumber |
| Tank perforation (step 3) | Not repairable | $1,200–$2,500 | 3–5 hours | Licensed plumber |
Drain valve (step 1)
DIY cost: $20–$35
Professional cost: $150–$250
Typical time: 45 minutes
Who should repair: Homeowner or licensed plumber
T&P discharge tube (step 2)
DIY cost: $15 gauge
Professional cost: $175–$450
Typical time: 1–2 hours
Who should repair: Licensed plumber
Tank perforation (step 3)
DIY cost: Not repairable
Professional cost: $1,200–$2,500
Typical time: 3–5 hours
Who should repair: Licensed plumber
Possible solutions you can do safely
- Work the elimination sequence in order: drain valve, then T&P tube, then tank base.
- Cap the drain valve with a brass hose cap to remove it from consideration in one step.
- Test house pressure with a $15 gauge before assuming the T&P valve is faulty.
- Keep a written log of when and where dampness reappears — it speeds up a plumber's diagnosis if you need one.
Fixes that usually waste money
- Replacing the tank before finishing the elimination sequence — many 'bottom leaks' turn out to be a $25 drain valve.
- Paying for a diagnostic visit for a problem you can isolate yourself in under 25 minutes total.
- Sealant products marketed to 'stop tank leaks' — none are effective on a perforated tank.
When to Call a Professional
- Both the drain valve and T&P tube test negative, leaving the tank body as the confirmed source.
- You're unsure how to safely test house water pressure or install an expansion tank.
- The unit is 8+ years old and the repair quote approaches half the cost of replacement.
- Water pools near a gas burner compartment or electrical connections.
Related Home Problems
These water heater symptoms often show up with the one on this page.
why is my water heater leaking from the bottom
Points at the same part of the system — both problems involve the drain.
Leaks & Water Pressure Repair soon
why is my water heater leaking
Points at the same part of the system — both problems involve the valve.
Leaks & Water Pressure Repair soon
why is my water heater leaking from the drain valve
Points at the same part of the system — both problems involve the after.
Leaks & Water Pressure Usually safe to investigate
why is my water heater dripping
Points at the same part of the system — both problems involve the valve.
Leaks & Water Pressure Usually safe to investigate
why is my water heater leaking?
Points at the same part of the system — both problems involve the step.
Leaks & Water Pressure Repair soon
Still not sure what you are hearing or seeing? Browse the leaks & water pressure guides or the full water heater guide index with repair-cost ranges.
Frequently Asked Questions
What's the fastest way to pinpoint a bottom leak?
Work through elimination in order: cap the drain valve first (takes under a minute), then check house pressure against the T&P discharge tube, and only then inspect the tank base itself. Most leaks resolve at step 1 or 2.
At what age should I stop repairing and just replace the unit?
If the tank is confirmed as the source and the unit is past eight years old, replacement is almost always the better value since tank-body leaks are not repairable and a full replacement runs $1,200–$2,500.
Can I use the elimination method on a gas water heater safely?
Yes, but turn the gas control to OFF before drying or inspecting near the burner compartment at the base, and let any pooled water evaporate before relighting the pilot.
Is it normal for water pressure to affect a bottom leak?
Yes — house pressure above 80 psi, or a spike after heating from thermal expansion, is what causes the T&P valve to discharge water down its tube to the floor near the base, which is a pressure fix, not a tank repair.
Sources
- U.S. Department of Energy — Storage Water Heaters — Service Life and Anode Protection
- American Society of Mechanical Engineers (ASME) — Temperature and Pressure Relief Valve Requirements
Published 2026-08-10 · Last reviewed 2026-08-10 · Reviewed by Why Is My Water Heater? editorial team · How we research