
why is my water heater leaking from the bottom
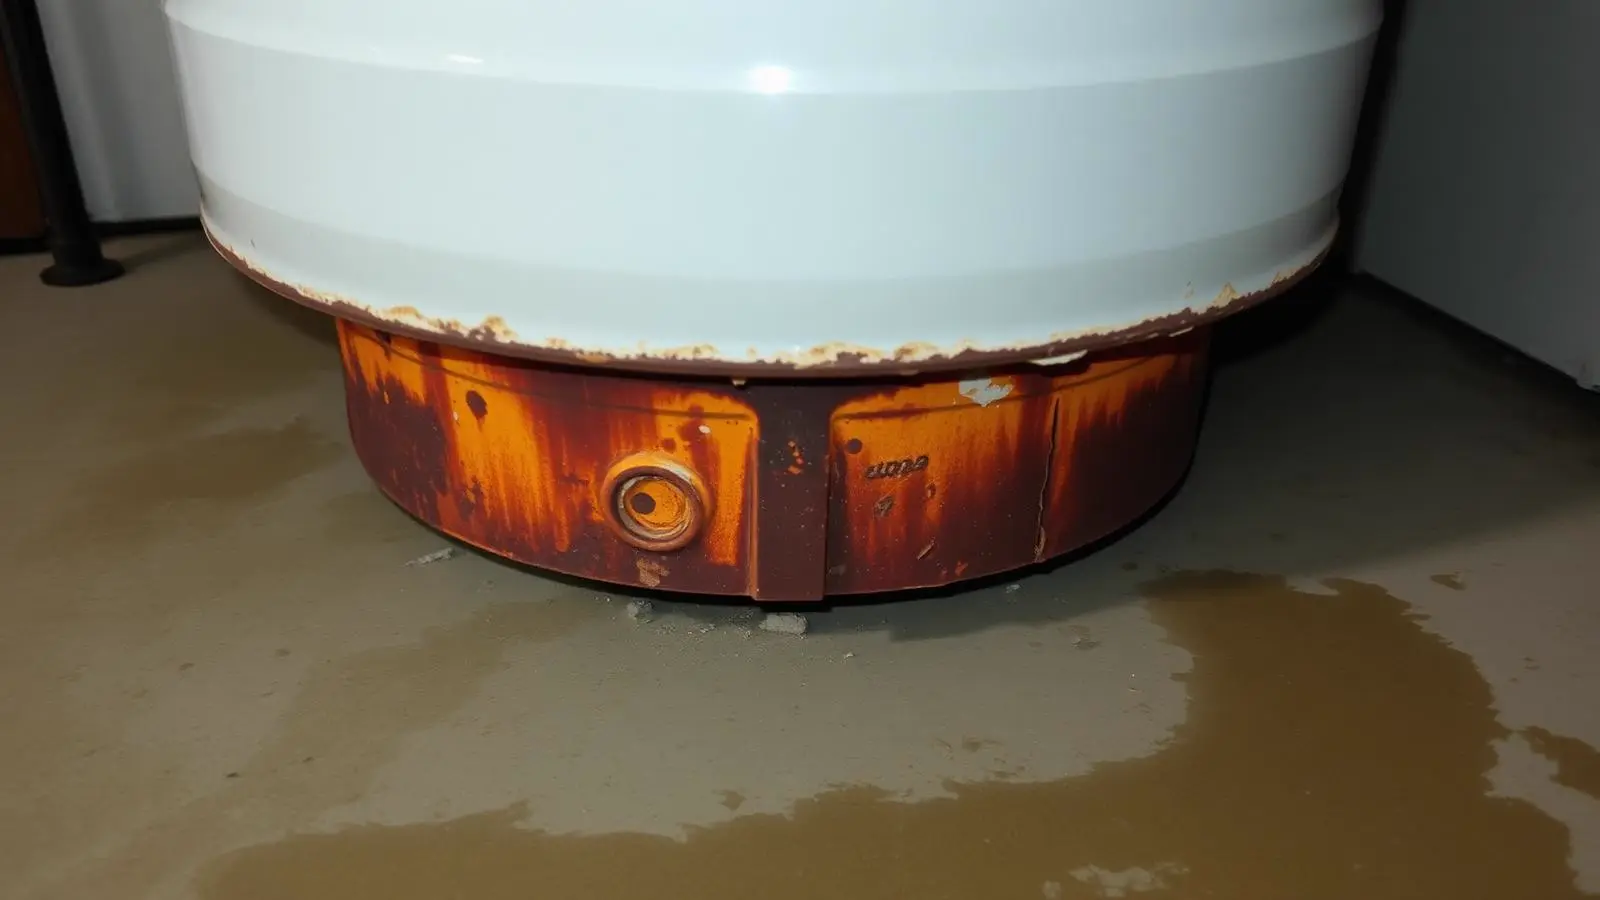
Causes, solutions and when to call a professional
Expert Answer
Bottom leaks come from three sources: the drain valve, the end of the T&P relief valve's discharge tube, or a perforated tank from internal corrosion. Only the last one requires replacement — the other two are inexpensive repairs.
How Serious Is This?
Usually Manageable
Monitor it and run the safe checks below before spending money.
Inspection Recommended
Have a professional look at it soon to prevent damage or failure.
This is the level for this problem: Repair soon.
Potentially Serious
Stop using the appliance and get professional help right away.
Safety warning
Bottom leaks pool directly beneath the unit, often reaching a gas burner compartment or electrical connections. Shut off power or gas before inspecting.
Most Likely Causes
- 1Failed or dripping drain valve
- 2T&P discharge tube dripping at floor level
- 3Tank perforation from internal corrosion
Safe Homeowner Checks
Dry the valve fully, thread a brass garden-hose cap on finger-tight, and watch the valve and floor for 10 minutes.
Takes: 10 min · Tools: Towel, Brass hose cap, Flashlight
Dry the valve fully, thread a brass garden-hose cap on finger-tight, and watch the valve and floor for 10 minutes.
Expect: Floor stays dry once the cap is on.
What it means: Dry with the cap on confirms the valve seat is the leak source.
Next step: Leave the cap on as a stopgap, then replace with a brass ball valve.
Attach a hose-bib pressure gauge to an outside spigot, read static pressure, then read again immediately after a full heating cycle.
Takes: 8 min · Tools: Water-pressure gauge
Attach a hose-bib pressure gauge to an outside spigot, read static pressure, then read again immediately after a full heating cycle.
Expect: Static pressure of 40–80 psi with a rise of less than 10 psi after heating.
What it means: A pressure spike above 80 psi confirms the valve is discharging appropriately, not failing.
Next step: Install or recharge a thermal expansion tank and add a pressure-reducing valve if needed.
Never cap or plug the discharge tube itself to stop the drip.
Dry the floor completely, tape white paper flat under the tank's center, and check after an hour of normal hot-water use.
Takes: 5 min · Tools: Towel, White paper, Tape
Dry the floor completely, tape white paper flat under the tank's center, and check after an hour of normal hot-water use.
Expect: Paper stays clean and dry if the tank base is intact.
What it means: Rust-stained moisture confirms the tank has perforated from the inside out.
Next step: Shut off water and power/gas immediately, and obtain replacement quotes.
A perforated tank can fail suddenly, releasing 40–80 gallons at once — do not delay.
Bottom leaks worry people more than top leaks because they can mean the tank itself has failed — but two of the three most common bottom sources have nothing to do with the tank body. Work through them in order before assuming the worst.
Every likely cause, ranked
- #1
Failed or dripping drain valve
Most common causeMost tanks ship with an inexpensive plastic drain valve. Sediment lodges in the seat after flushing, and repeated heat cycling warps the plastic, so it never fully closes again.
It sits at the lowest point of the tank, so any weep lands directly on the floor below center — the classic 'bottom leak' presentation, and the cheapest to fix.
Exact symptoms
- Slow drip visible from the spigot opening itself
- Wet patch directly under the valve, dry elsewhere around the base
- Leak started or worsened after a recent tank flush
Self-test (10 min) — tools: Towel, Brass hose cap, Flashlight
Dry the valve fully, thread a brass garden-hose cap on finger-tight, and watch the valve and floor for 10 minutes.
Expect: Floor stays dry once the cap is on.
What it means: Dry with the cap on confirms the valve seat is the leak source.
Next step: Leave the cap on as a stopgap, then replace with a brass ball valve.
DIY-eligible · DIY $8 cap, $20–$35 replacement valve · Pro $150–$250 · 45 minutes
- #2
T&P discharge tube dripping at floor level
The relief valve's discharge tube routes down the side of the tank and terminates a few inches above the floor. When the valve opens due to excess pressure or thermal expansion, water exits at floor level, well away from the tank body but still 'at the bottom.'
People trace the wet floor upward and see the tube ending near the base, mistaking a pressure problem for a tank leak.
Exact symptoms
- Water appears only at the open end of a pipe near the floor, not under the tank center
- Discharge occurs after long heating cycles, then stops
- Tank base itself stays dry when the tube is diverted or capped temporarily for testing
Self-test (8 min) — tools: Water-pressure gauge
Attach a hose-bib pressure gauge to an outside spigot, read static pressure, then read again immediately after a full heating cycle.
Expect: Static pressure of 40–80 psi with a rise of less than 10 psi after heating.
What it means: A pressure spike above 80 psi confirms the valve is discharging appropriately, not failing.
Next step: Install or recharge a thermal expansion tank and add a pressure-reducing valve if needed.
Never cap or plug the discharge tube itself to stop the drip.
Professional repair · DIY $15 gauge to diagnose · Pro $175–$450 · 1–2 hours
- #3
Tank perforation from internal corrosion
Once the sacrificial anode rod is fully consumed, unprotected steel at the bottom of the tank — the area exposed to the most sediment and moisture — rusts through from the inside.
On a heater older than eight to twelve years, with the drain valve and T&P tube both ruled out, this is the remaining explanation and it is not repairable.
Exact symptoms
- Water reappears directly under the tank's center within minutes of drying it
- Rust-tinted water on the floor
- Drain valve and T&P tube both test dry/normal
Self-test (5 min) — tools: Towel, White paper, Tape
Dry the floor completely, tape white paper flat under the tank's center, and check after an hour of normal hot-water use.
Expect: Paper stays clean and dry if the tank base is intact.
What it means: Rust-stained moisture confirms the tank has perforated from the inside out.
Next step: Shut off water and power/gas immediately, and obtain replacement quotes.
A perforated tank can fail suddenly, releasing 40–80 gallons at once — do not delay.
Professional repair · DIY Not repairable · Pro $1,200–$2,500 installed replacement · 3–5 hours
Symptom-to-cause table
Match what you can see, hear or smell to the cause it points at, and the safe next step for that reading.
Slow drip visible from the spigot opening itself
Likely cause: Failed or dripping drain valve
Who should handle it: Homeowner, then licensed plumber
Next step: Leave the cap on as a stopgap, then replace with a brass ball valve.
Water appears only at the open end of a pipe near the floor, not under the tank center
Likely cause: T&P discharge tube dripping at floor level
Who should handle it: licensed plumber
Next step: Install or recharge a thermal expansion tank and add a pressure-reducing valve if needed.
Water reappears directly under the tank's center within minutes of drying it
Likely cause: Tank perforation from internal corrosion
Who should handle it: licensed plumber
Next step: Shut off water and power/gas immediately, and obtain replacement quotes.
Ten-minute homeowner checklist
- Dry the valve fully, thread a brass garden-hose cap on finger-tight, and watch the valve and floor for 10 minutes. (10 min · Towel, Brass hose cap, Flashlight)
- Attach a hose-bib pressure gauge to an outside spigot, read static pressure, then read again immediately after a full heating cycle. (8 min · Water-pressure gauge)Never cap or plug the discharge tube itself to stop the drip.
- Dry the floor completely, tape white paper flat under the tank's center, and check after an hour of normal hot-water use. (5 min · Towel, White paper, Tape)A perforated tank can fail suddenly, releasing 40–80 gallons at once — do not delay.
Never open an electrical panel, relight a burner you can smell gas near, or drain a tank that is scalding hot. Stop and call a licensed plumber instead.
What this costs to fix
| Cause | DIY cost | Professional cost | Typical time | Who should repair |
|---|---|---|---|---|
| Failed drain valve | $20–$35 | $150–$250 | 45 minutes | Homeowner or licensed plumber |
| T&P discharge tube dripping | $15 gauge | $175–$450 | 1–2 hours | Licensed plumber |
| Tank perforation from corrosion | Not repairable | $1,200–$2,500 | 3–5 hours | Licensed plumber |
Failed drain valve
DIY cost: $20–$35
Professional cost: $150–$250
Typical time: 45 minutes
Who should repair: Homeowner or licensed plumber
T&P discharge tube dripping
DIY cost: $15 gauge
Professional cost: $175–$450
Typical time: 1–2 hours
Who should repair: Licensed plumber
Tank perforation from corrosion
DIY cost: Not repairable
Professional cost: $1,200–$2,500
Typical time: 3–5 hours
Who should repair: Licensed plumber
Possible solutions you can do safely
- Cap a dripping drain valve with a brass hose cap as an immediate stopgap.
- Replace a plastic drain valve with a brass ball-valve type.
- Check and correct house water pressure with a $15 gauge before assuming a valve is broken.
- Lower the thermostat to 120 °F to reduce thermal-expansion-driven discharges.
Fixes that usually waste money
- Tank patch kits or epoxy on a rust perforation — the surrounding steel is already too thin to hold a seal.
- Replacing the T&P valve when the real issue is house pressure above 80 psi; the new valve will discharge too.
- Ignoring a warped plastic drain valve for years instead of a $25 brass swap.
When to Call a Professional
- Water returns to the same spot under the tank's center within minutes of drying, even with the drain valve capped.
- House static pressure tests above 80 psi.
- The heater is gas-fired and the pooled water reaches the burner compartment.
- The unit is 8+ years old and a bottom leak is confirmed at the tank body.
Related Home Problems
These water heater symptoms often show up with the one on this page.
why is my water heater leaking
Points at the same part of the system — both problems involve the valve.
Leaks & Water Pressure Repair soon
why is my water heater leaking at the bottom
Points at the same part of the system — both problems involve the drain.
Leaks & Water Pressure Repair soon
why is my water heater leaking from the drain valve
Points at the same part of the system — both problems involve the after.
Leaks & Water Pressure Usually safe to investigate
why is my water heater leaking from the top
Points at the same part of the system — both problems involve the valve.
Leaks & Water Pressure Repair soon
why is my water heater leaking from the overflow pipe
Points at the same part of the system — both problems involve the valve.
Leaks & Water Pressure Repair soon
Still not sure what you are hearing or seeing? Browse the leaks & water pressure guides or the full water heater guide index with repair-cost ranges.
Frequently Asked Questions
Is a bottom leak always the tank itself?
No. The drain valve and the T&P relief valve's discharge tube both exit near the bottom and are common, repairable sources. A true tank-body perforation is usually the least likely cause and mainly affects units past eight years old.
How do I tell a drain valve leak from a tank leak?
Cap the drain valve with a brass hose cap and dry the floor. If it stays dry, the valve was the source. If water still reappears under the tank's center, the leak is coming from the tank body itself.
Can I keep using the water heater with a bottom leak?
A capped, confirmed drain-valve drip can typically wait a few days for a scheduled repair. A confirmed tank-body leak should not be used — shut off the water supply and power/gas and arrange replacement promptly.
How much does fixing a bottom leak typically cost?
A drain-valve replacement runs $150–$250 professionally installed, or $20–$35 in parts if done yourself. A confirmed tank perforation requires full replacement at $1,200–$2,500 installed, since the tank cannot be patched.
Sources
- U.S. Department of Energy — Water Heater Maintenance — Draining and Flushing
- International Code Council — International Plumbing Code, Section 504 — Water Heater Relief Valves
Published 2026-08-10 · Last reviewed 2026-08-10 · Reviewed by Why Is My Water Heater? editorial team · How we research